Standalone App for Mac Coming Soon
ProImpose
Build press-ready impositions straight from InDesign.
Dynamic Booklet Imposition: Automatically handle complex booklet pagination and layouts in seconds. It ensures your files are press-ready without the manual math or the risk of "human error" pagination flips.
Intelligent Mark Management: The script understands your hardware. It features built-in logic to intelligently disable Duplo marks when booklet mode is active, preventing registration conflicts and saving you from tedious manual cleanup.
Clean, Adaptive UI: Built for a fast-paced production environment, the interface is lean. The imposition menu only appears when you actually need it, keeping your workspace uncluttered and your focus on the job.
Native Integration: Because it runs directly inside InDesign, you maintain full control over your document's color management and assets right up until the moment of imposition.

Features
Batch Processing
Data Merge Compatibility
Sequencing Tools
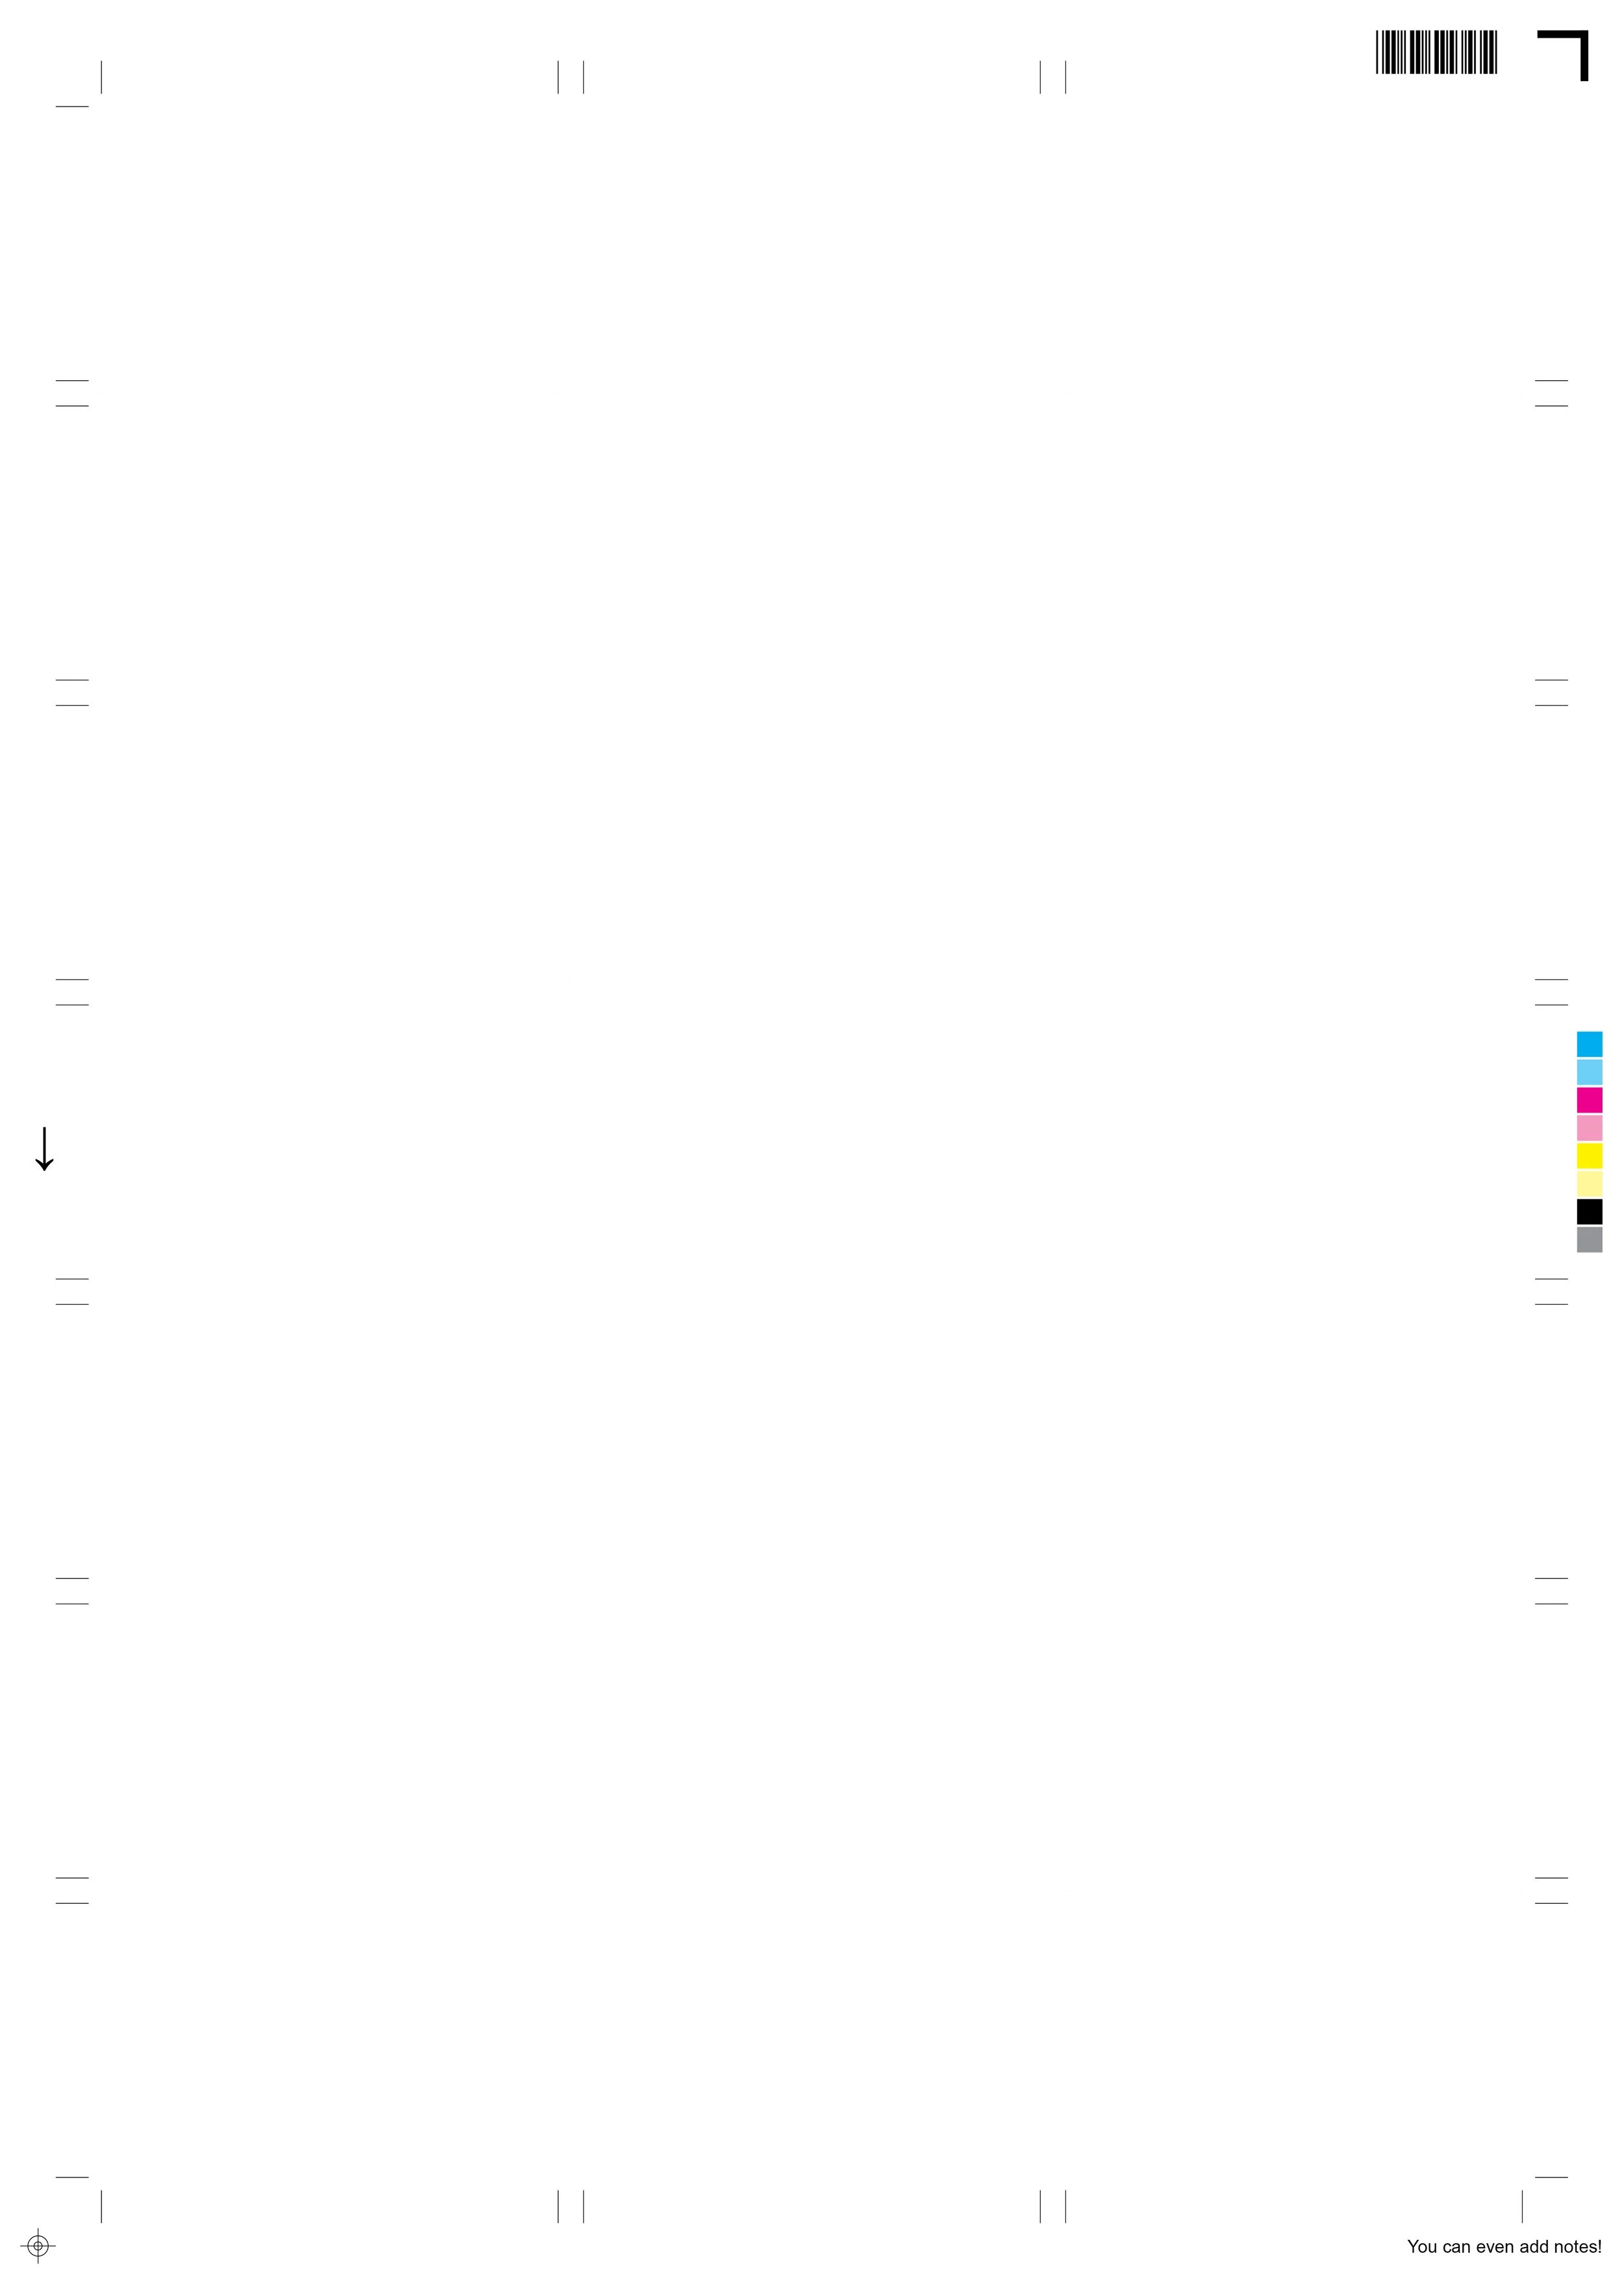
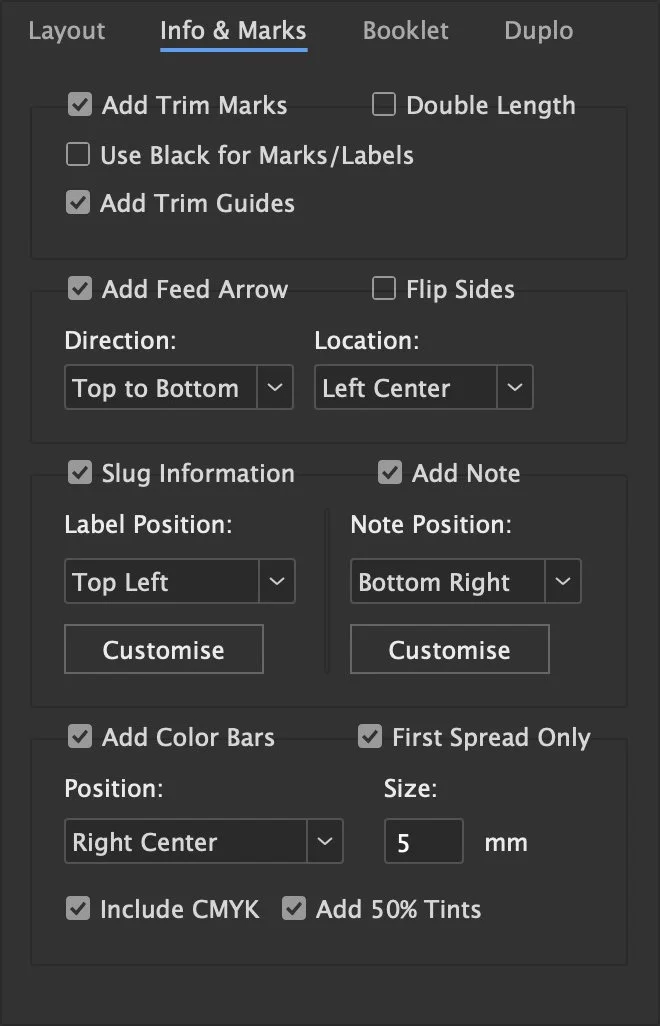
Automatic Color Bars
Custom User Notes
Trim Guides
Dynamic Slug Information
Feed Arrows
Automated Trim Marks
Embedded Configuration
*Position Shifting
*Importable Duplo Job Names
*Duplo Finishing Integration
*Cover Push Adjustment
*Auto Booklet Creep
*Booklet Imposition
*1:1 Duplo Preview
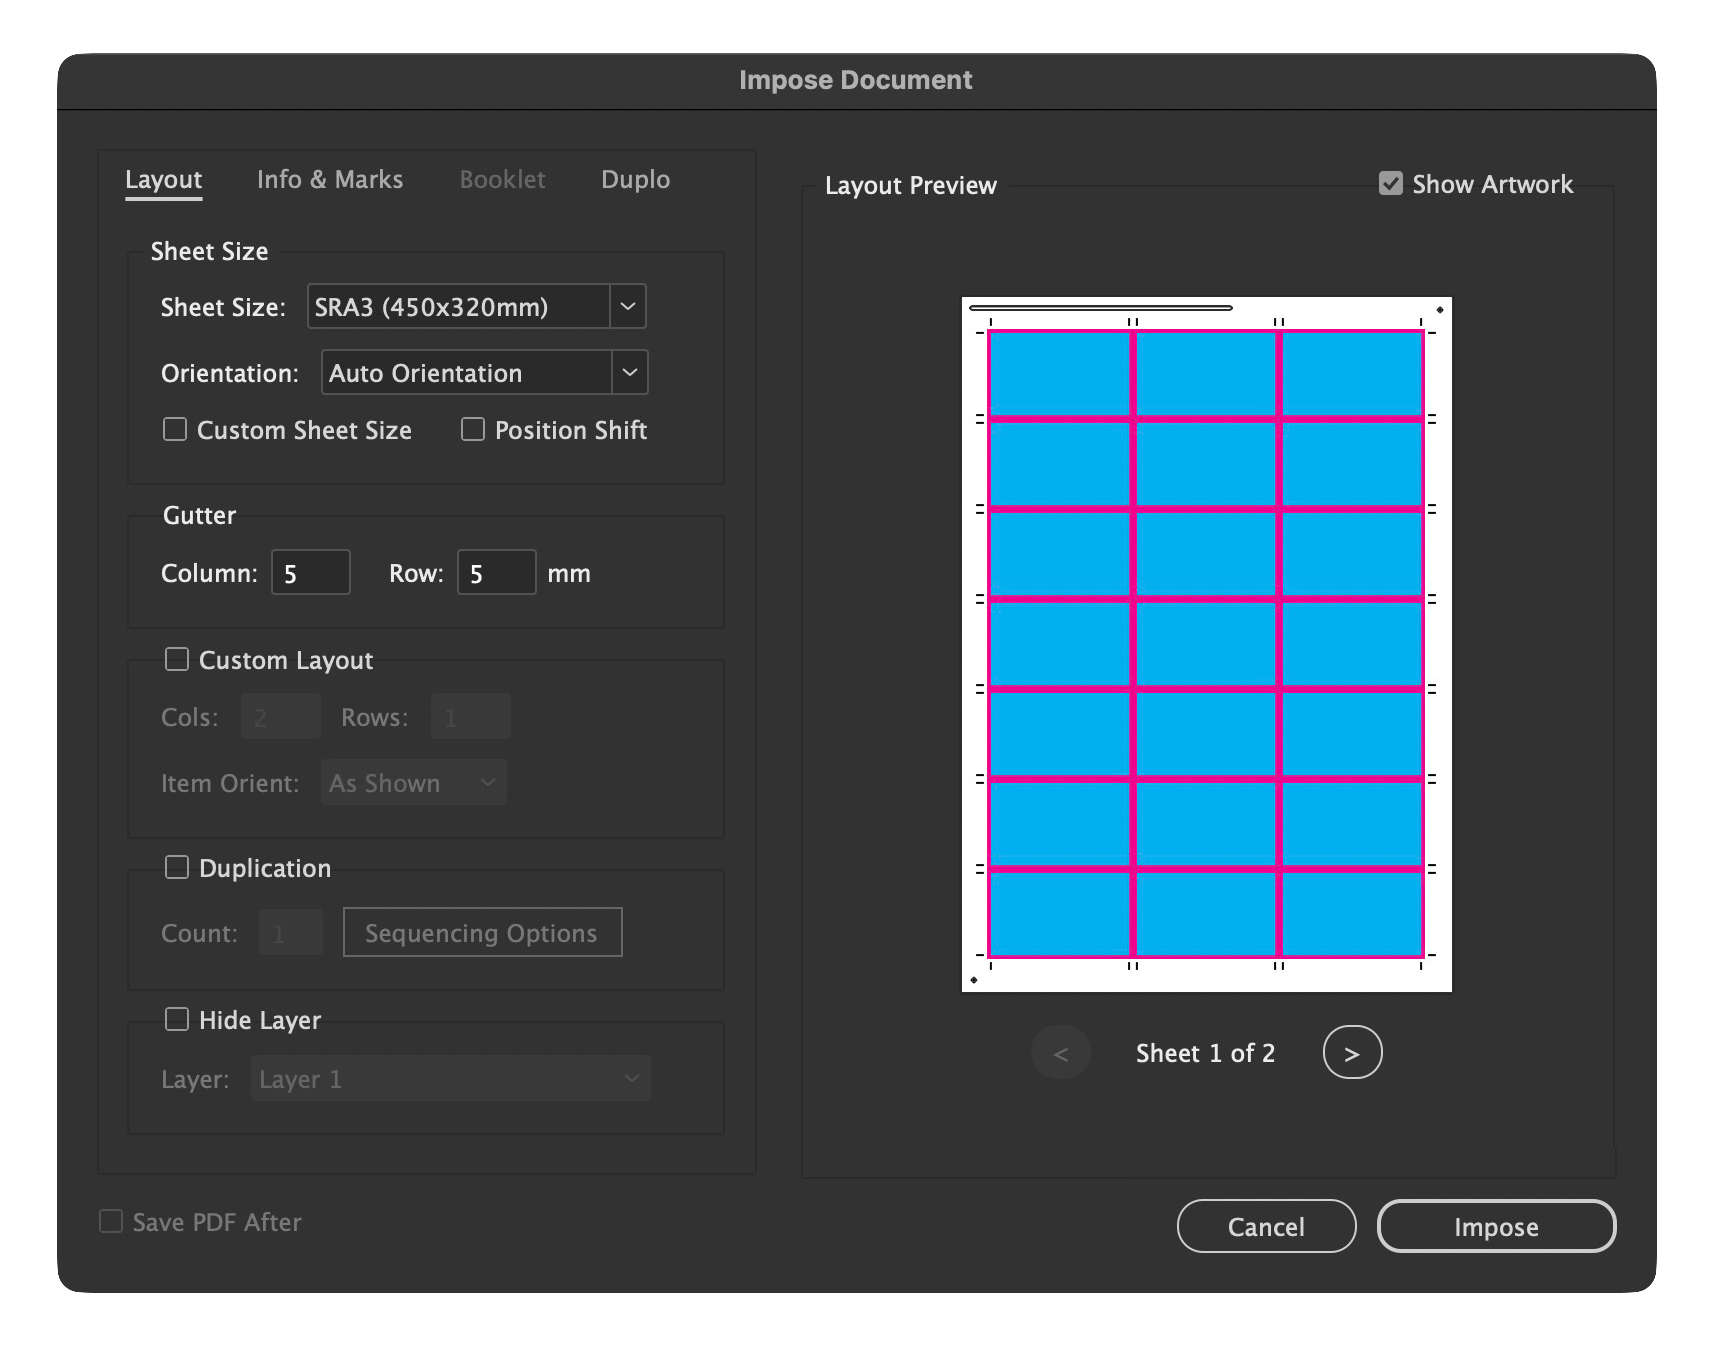
Live Layout Preview
Batch Processing Data Merge Compatibility Sequencing Tools Automatic Color Bars Custom User Notes Trim Guides Dynamic Slug Information Feed Arrows Automated Trim Marks Embedded Configuration *Position Shifting *Importable Duplo Job Names *Duplo Finishing Integration *Cover Push Adjustment *Auto Booklet Creep *Booklet Imposition *1:1 Duplo Preview Live Layout Preview
A tour of the settings!


Layout
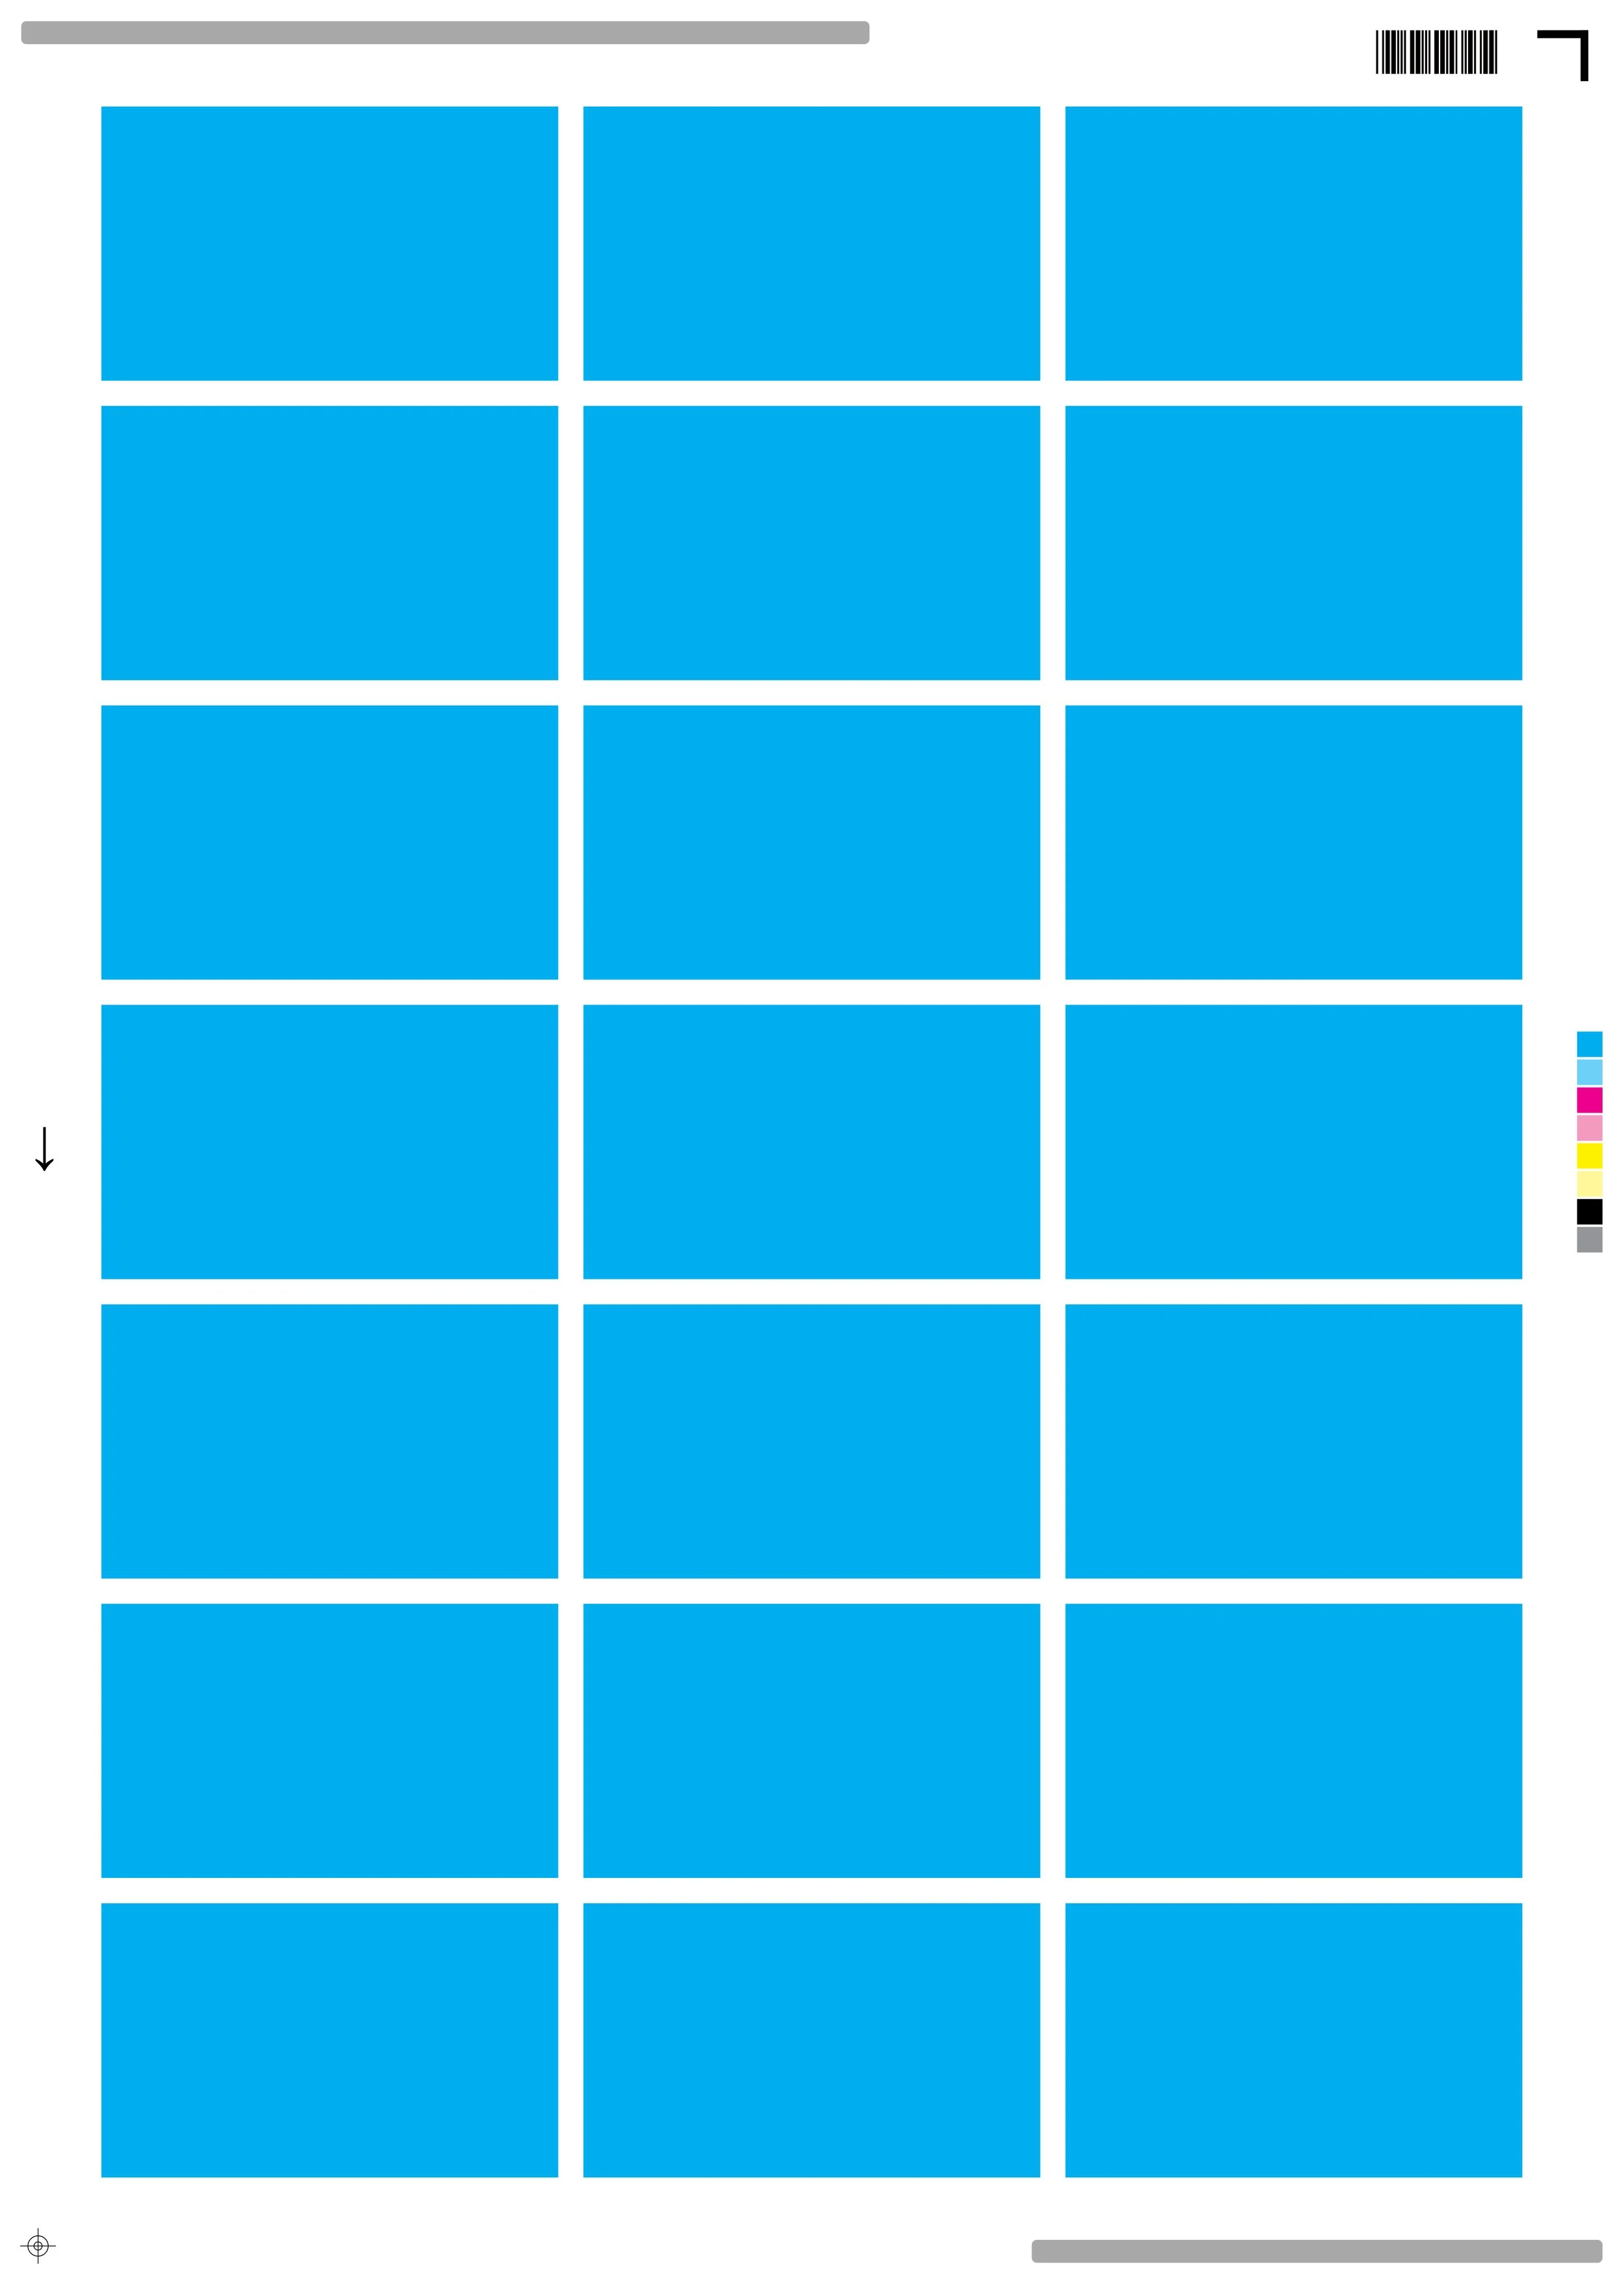
Manages the core grid strategy, allowing you to choose between automatic yield or manual column and row inputs. It also includes controls for item orientation, sheet gutters, and duplication counts.
aswell as Custom Sheet Size* and Position Shift*
Info & Marks
Contains all finishing and documentation options, such as trim marks, trim guides, and feed arrows. This is also where you configure the slug information (filename, date, etc.) and add custom user notes.
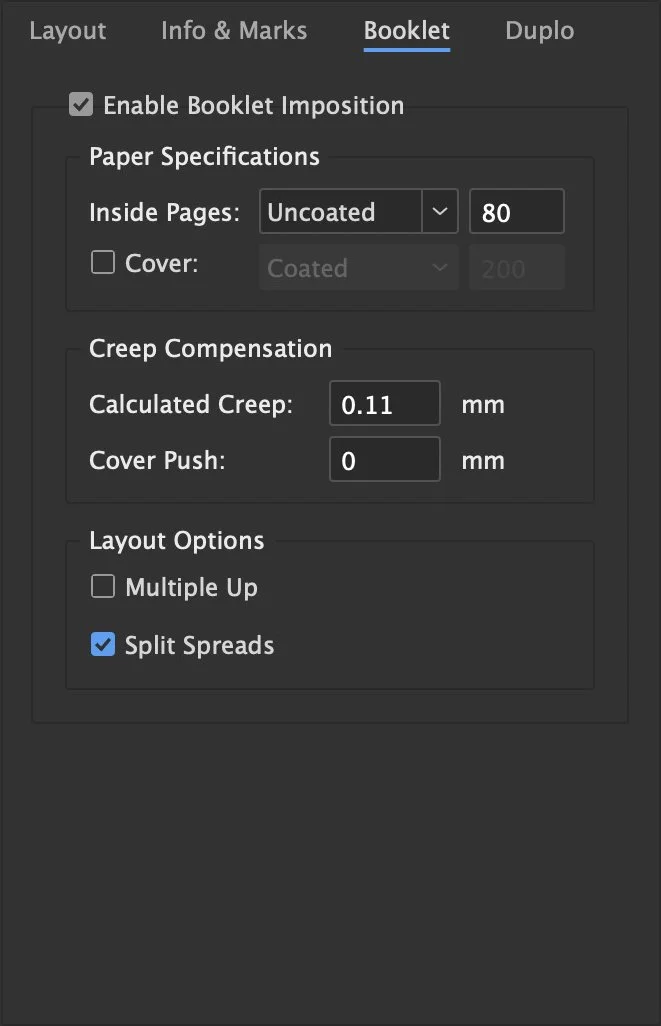
Booklet*
Dedicated to saddle-stitch imposition, featuring automatic creep calculation based on stock weight and controls for "cover push" adjustments. It also includes a "multiple-up" option to fit more than one booklet on a sheet.
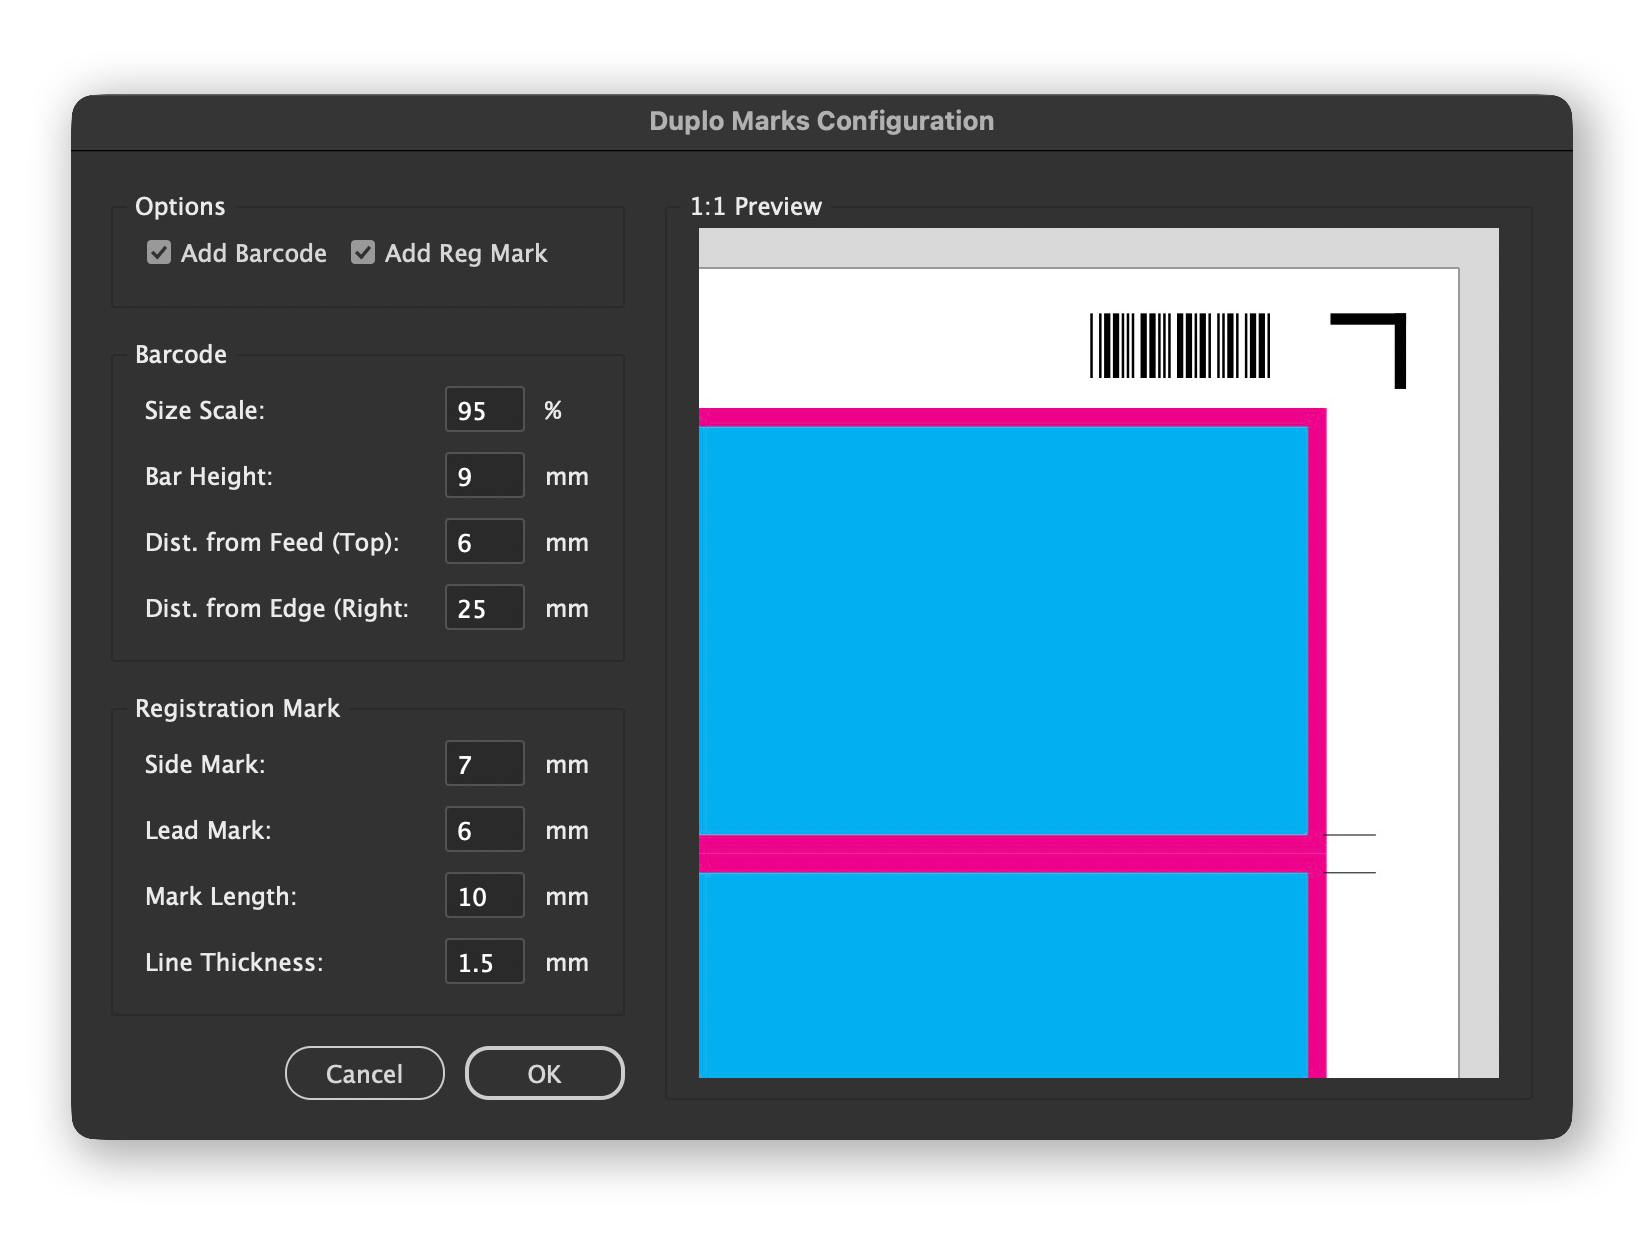
Duplo*
Specifically for digital finishing, providing a searchable list to select job numbers and toggles for Code 39 barcodes and registration marks. It includes a dedicated preview to verify mark placement.
*Only available in ProImpose Max
Layout Preview
See exactly what you are doing to elimnate the guess work
Show Artwork Off
Show Artwork On

Click the layout preview to bring up a Bigger view
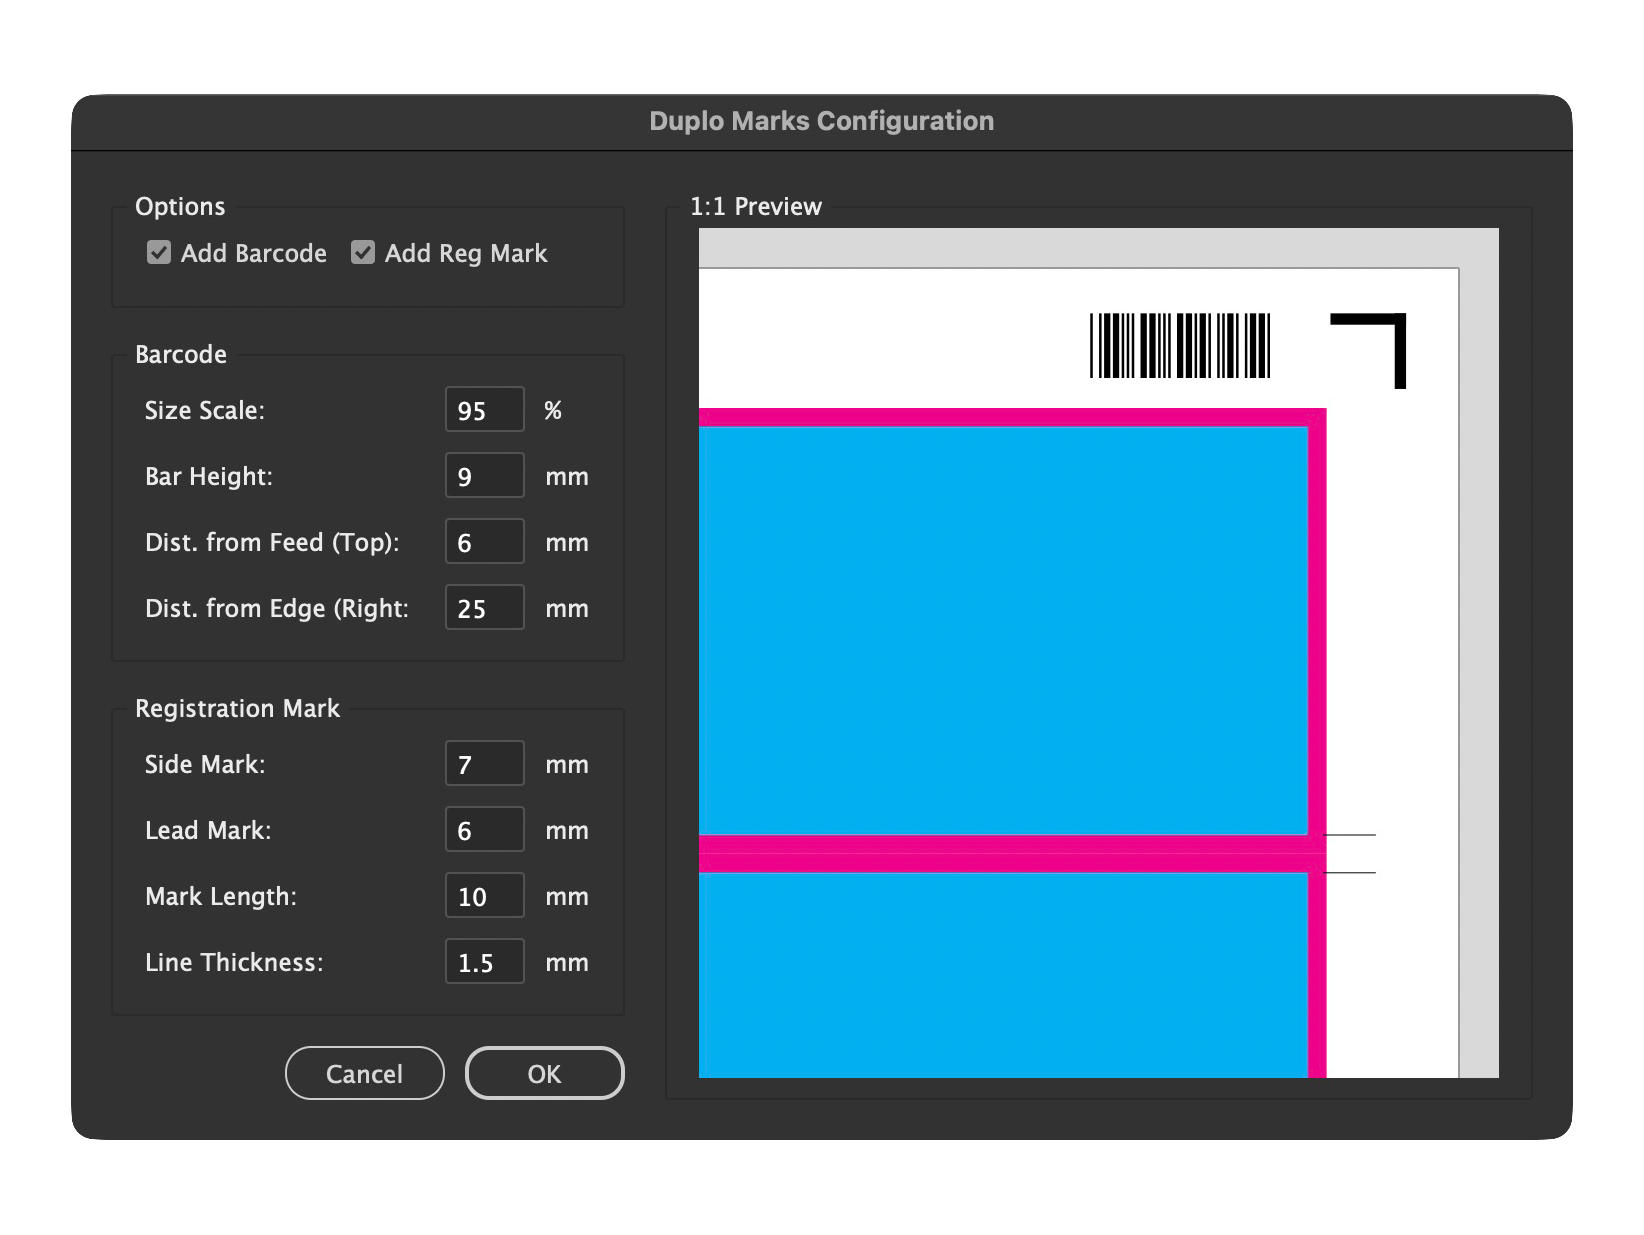
Duplo Barcodes &
Regrestration Marks

The Duplo tab is designed specifically for automated digital finishing, allowing you to bridge the gap between your InDesign layout and a Duplo DC-series cutter/creaser. It eliminates the need for manual mark placement by generating machine-readable Code 39 barcodes and registration marks directly onto your press sheets.
How to Use the Duplo Tab
Enable Marks: Toggle the Add Duplo Marks checkbox to activate the machine-finishing features for your current imposition.
Select Job Number: Scroll through the searchable list to select the specific 3-digit job code (001–250) that corresponds to your Duplo machine's saved program.
Import Job Names: Use the Import CSV button to load an AllJobs CSV file.
This populates the list with your actual program names, making it easier to identify the correct setting.
Customize Appearance: Click Duplo Marks Settings to adjust the barcode scale, bar height, and lead/side margins to suit your specific stock and gripper requirements.
Verify with 1:1 Preview: Before running the script, use the dedicated preview window to see a life-size representation of the barcode and registration bracket in relation to your artwork and crop marks.
Automated Logic: The tab handles mark conflicts automatically—for example, it will intelligently disable specific marks when a booklet imposition is active to ensure a clean trim.
*Only available in ProImpose Max
Booklet
Imposition
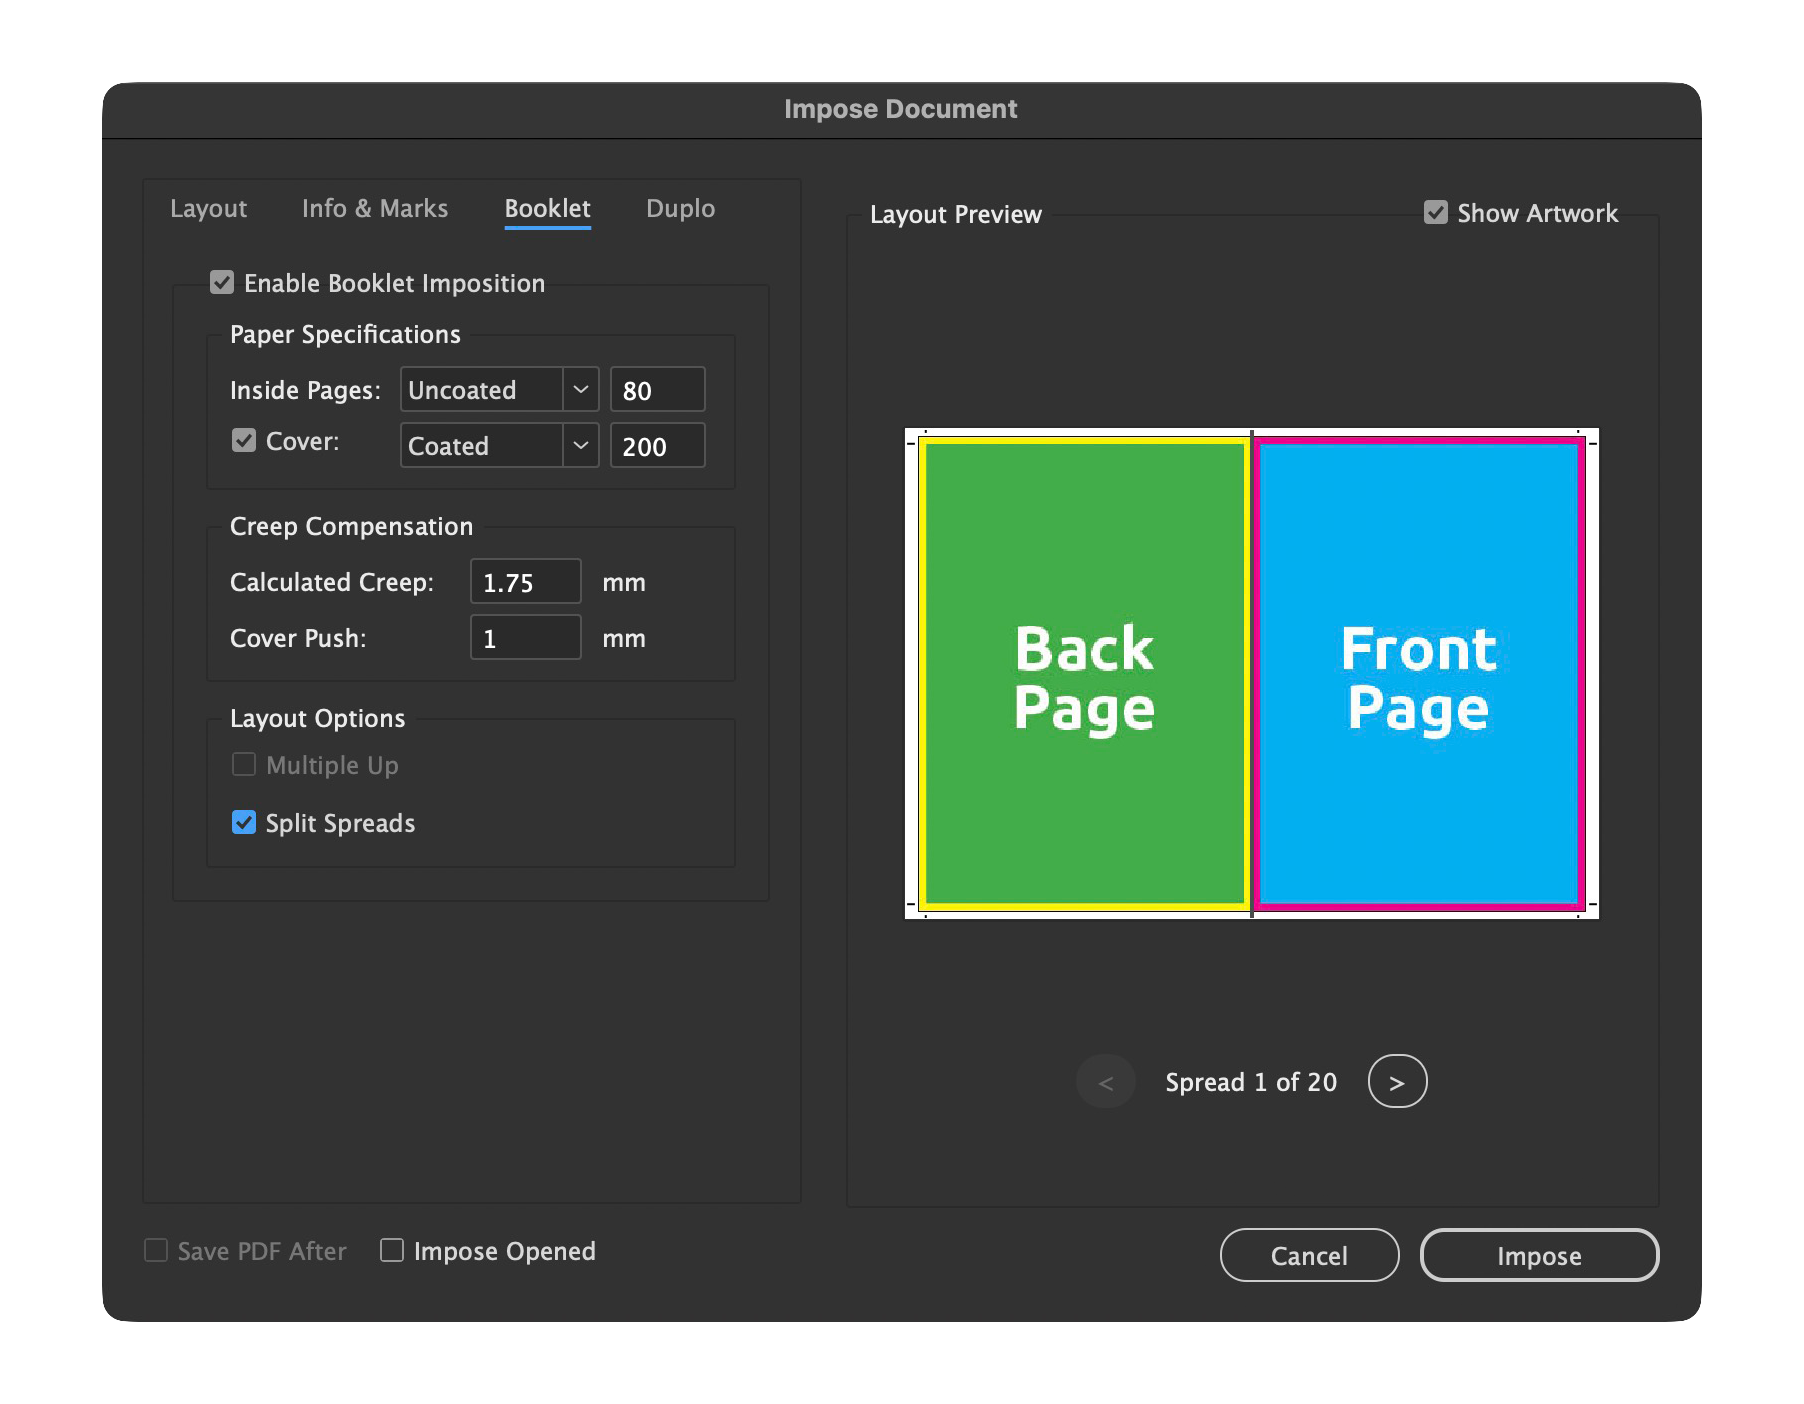
The Booklet tab provides specialized tools for creating
saddle-stitch layouts, ensuring that your InDesign pages are correctly ordered for printing and folding. It moves beyond simple page positioning by factoring in the physical thickness
of the paper stock to maintain alignment across the entire signature.
How to Use the Booklet Tab
Enable Booklet Mode: Checking the Enable Booklet Imposition box switches the script from standard grid imposition to printer-spread logic.
Stock Specifications: Enter the GSM and paper type (Coated or Uncoated) for both your inside pages and cover.
Automatic Creep Calculation: The script automatically determines the necessary "creep" offset based on your page count and paper thickness to prevent the inner pages from shifting outward after folding.
Cover Push: Use the Cover Push field to manually adjust the cover position, which is useful for correcting alignment on particularly thick booklets where the wrap might be uneven.
Multiple-Up Layouts: If your sheet size allows, enable Multiple Up to impose more than one booklet per press sheet (e.g., A5 2-up on SRA4).
Split Spreads: Use the Split Spreads toggle to temporarily separate facing pages into single pages before imposition, preventing bleed overlap issues at the spine.
*Only available in ProImpose Max
Try before you Buy!
Experience the full power of the script before committing to the Lite or Max editions.
The trial version provides unrestricted access to every feature within your actual production environment, allowing you to validate your workflow before purchasing.
Full Feature Access: Test every advanced tool—including Booklet imposition, Duplo finishing, and Position Shifting with no locked menus or disabled settings.
Watermarked Output: You can generate complete impositions, but a "PROIMPOSE TRIAL MODE" watermark is added across the artwork on every page.
Production Validation: Use the trial to confirm that Duplo barcodes and registration marks align perfectly with your finisher's programs.
No Time Limit: Explore the interface and fine-tune your templates for as long as you need.
Buy ProImpose
Just sign up and make a single one-time payment for permanent access. Once processed, a button will appear at the top right of your screen showing your edition and giving you instant access to the latest version. One payment gets you the tool and every future update for that edition.
Signup and Buy and get access to future updates!
ProImpose Lite
Live Layout Preview for real-time visual feedback
Standard Grid Imposition (N-Up)
Settings saved directly into document metadata
Automated Trim Marks and Trim Guides
Dynamic Slug Information (Filename, Date, etc.)
Custom User Notes placement
Automatic Color Bars (CMYK and Spot)
Production Sequencing (Cut & Stack, Loop-to-Fill)
Batch Processing of open documents
ProImpose Max
All features included in the Lite edition, plus:
Automatic Booklet Imposition for saddle-stitch spreads
Calculated Booklet Creep based on GSM and stock type
Duplo Finishing Integration (Code 39 Barcodes and Reg Marks)
1:1 Scale Preview for verifying Duplo mark placement
Custom Sheet Size support for non-standard stock
Precision Position Shifting (Manual X/Y grid offsets)
Advanced Cover Push control for heavy-stock booklets
Searchable Duplo Job Name import via CSV
Installation
To get ProImpose running, you need to place the script file into the InDesign directory so it can access the necessary system permissions for saving your settings and Duplo job names.
Where to Install
It is highly recommended to install the script in the User folder within the InDesign Scripts panel. This ensures the script has the correct permissions to save the duplo_names.csv file to your Documents directory.
Windows:
C:\Users\[Username]\AppData\Roaming\Adobe\InDesign\Version [X]\en_US\Scripts\Scripts PanelmacOS:
/Users/[Username]/Library/Preferences/Adobe InDesign/Version [X]/en_US/Scripts/Scripts Panel
Pro Tip: You can find this folder easily by opening InDesign, going to Window > Utilities > Scripts, right-clicking the "User" folder, and selecting Reveal in Explorer (Windows) or Reveal in Finder (macOS).
Setting up a Keyboard Shortcut
For the fastest workflow, you should map ProImpose to a keyboard shortcut (like Ctrl+Shift+I or Cmd+Shift+I).
Go to Edit > Keyboard Shortcuts...
Set the Product Area to Scripts.
Scroll down until you find User: ProImpose Source.jsx.
Click into the New Shortcut field and press your desired key combination.
Click Assign and then OK.